JDeveloper
JRebel for JDeveloper requires Oracle JDeveloper Studio edition version 11.1.1.6.0 or newer.
JRebel for JDeveloper includes JRebel itself and helps you to generate the JRebel configuration automatically. It also enables JRebel for applications and the integrated WebLogic server with a single click. It improves the debugging support in JDeveloper.
Note
Working with JRebel, JDeveloper and ADF? We have created a separate tutorial for you. You can find it here: JRebel with JDeveloper and ADF.
Installation
Download the extension archive from http://dl.zeroturnaround.com/jrebel/jdeveloper/.
Open Help > Check for Updates….
Select Install From Local File. Locate the extension archive you downloaded earlier.
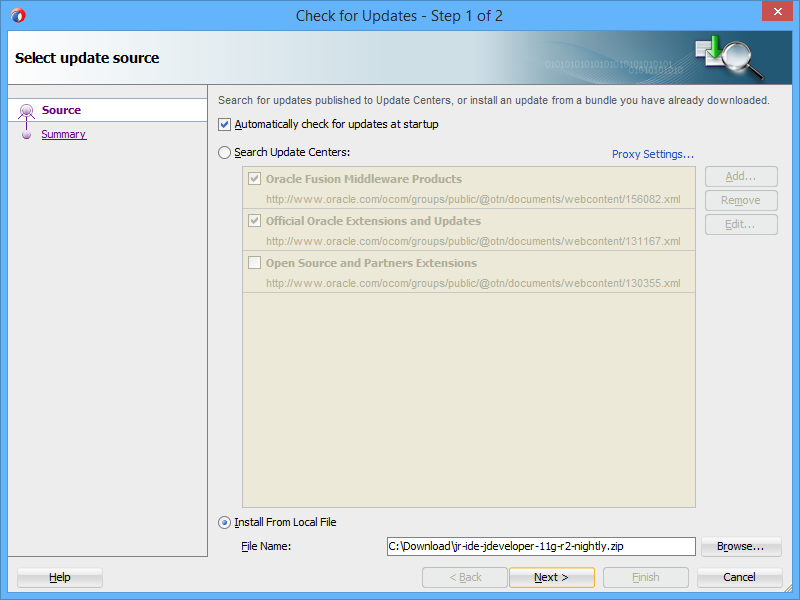
Press Next to review your installation. Press Finish to complete.

JDeveloper will request a restart. Go ahead and restart.
Note
JRebel requires JDeveloper to be run using the Studio Developer (All Features) role for the plugin to function. Picking any other role at JDeveloper startup will disable the JRebel plugin. When starting JDeveloper, make sure to pick the Studio Developer role option.

Activation
Following the restart you should see the dedicated JRebel button on your main JDeveloper toolbar. Like this:

If you do not have a JRebel license installed yet, you will need to activate your copy of JRebel.
Open Tools > Preferences. Find JRebel in the left hand menu.

Press the JRebel config center link and select Activation from the left hand menu.
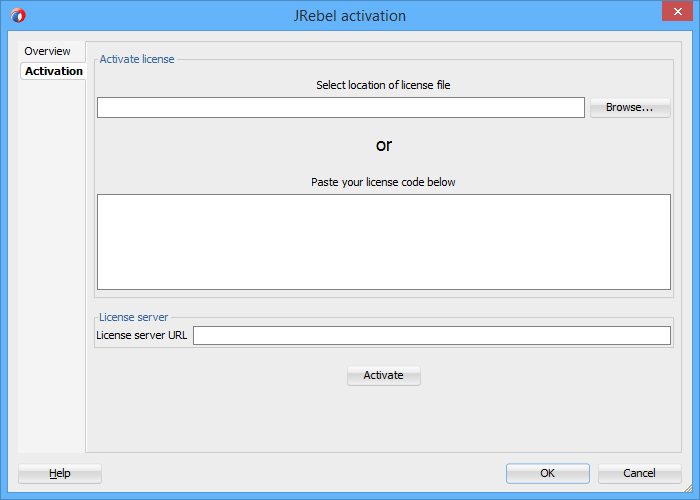
There are several licensing options that you can choose from:
You can select a location of a license file that you have saved on your file system.
You can paste the key of your evaluation license.
You can paste the License Server URL (when issued the URL from an administrator).
Enter your license information and press Activate. JDeveloper will let you know that the activation was a success by displaying a popup message.
Project configuration
The only necessary JRebel configuration file is rebel.xml. This is used to map the running application to the workspace. The JRebel IDE extension can generate this file for you. To make this happen, follow these steps:
Right-click your project and select Project Properties > JRebel.
Press Generate now!.
A file named rebel.xml should appear in your project source directory. You will also be notified of this in the console log.
Note
Once you have generated rebel.xml, you need to redeploy your application to the server for the configuration to take effect.
If you would like to make modifications to the configuration file, please see the full reference for rebel.xml file format.
Note that when using either Maven or Gradle for your project, you might consider using the respective plugin for generating rebel.xml (and not the IDE plugin). For more information, please refer to either Maven plugin or Gradle plugin.
Working with JRebel
Enabling/disabling JRebel agent
Press the JRebel button on the toolbar to enable or disable the extension. When JRebel is enabled, the integrated WebLogic server and standalone Java applications will be started with JRebel. Other Java processes launched from the IDE might also start with JRebel enabled. If this causes problems, disable JRebel before starting these processes. Toggling the button will have no effect on the processes that are already running.
Reloading Java classes and resources
JRebel does not compile classes, it only reloads them. JDeveloper doesn’t compile changed classes automatically. This means that you will have to manually make your project after changing Java code. Depending on your JRebel configuration and the project setup, you may or may not need to make the project in order for changes in non-class resources to be reloaded.
Avoid rebuilding your project when the application is running with JRebel. JRebel uses file timestamps to check if they have been modified. Reloading all the resources in a large application will be extremely slow.
External servers
If you launch the application server from a command line, please refer to “Running the container from command line” chapter to find the relevant configuration examples.
IDE log level configuration
You can configure the JRebel IDE plugin log level using a command line parameter. You can add this parameter to your {user.home}/.jrebel/jrebel.properties file.
rebel.ide.log=[off|error|warn|info|debug|trace]
The default value for this property is info. The JRebel IDE plugin log file itself is stored in {user.home}/.jrebel/.